So one of the fun things about non-writ peerages is that you never know what the recipient is going to wear, I mean, yes, you go to their house and steal their clothes and bring it to NY.. but sometimes they do silly things like keeping wool garb in a ceder chest (after it had been attacked by moths in the past, so totally a good idea). But regardless, we couldn’t find the viking dress we had planned to bring for Thyra to have the option to wear.
But one of the great things about non-writ peerages is interpreting their in case of peer letters. One of the things that Thyra asked for was viking styled award regalia, namely a viking swag. Naomi and Leanne asked me to make a medallion for that and then it morphed into me organizing the project, which was a great deal of fun.
Firstly I needed beads. This is not in my skill set, and really probably should never be in my skill set, but that’s where these projects become fun projects – Collaboration time!
It just happened to work out that Birka was the weekend before the event, so I had a great opportunity to meet up with some of the most talented glass lampwork bead makers in the East. I contacted them ahead of time and explained the project and everyone was excited to participate and bring beads to Birka.
I started with Mistress Elysabeth Underhill because when I think lampwork, I think her. She couldn’t go to Birka this year, but sent me the beads through the mail – 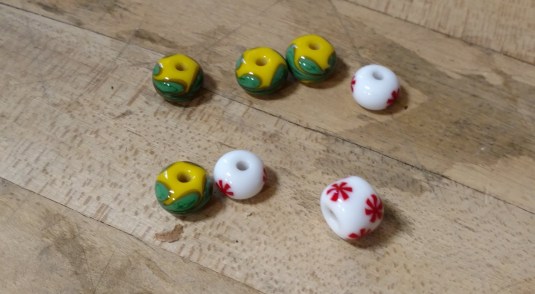
I asked her for suggestions for who else to ask and she suggested I talk to Mistress Elizabeth Elenore Lovell, Mistress Tola knitýr and of course Mistress Iulia Agricola.
Beads from Mistress Elizabeth Elenore Lovell
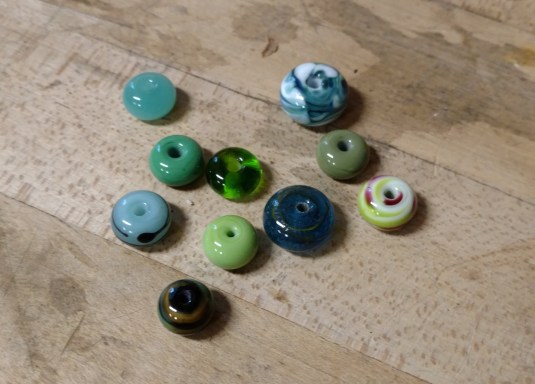
Beads from Mistress Tola knitýr
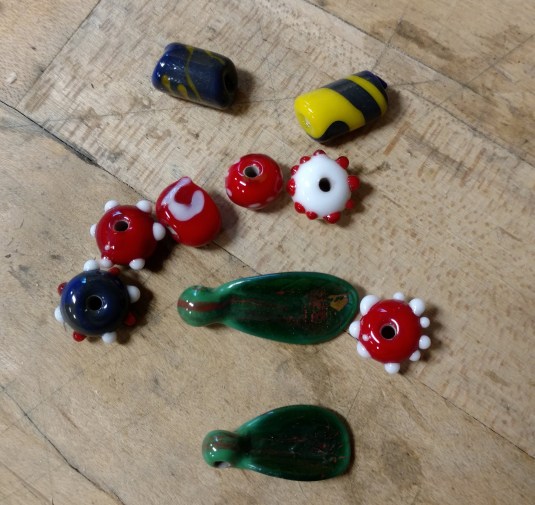
And I met up with Mistress Iulia Agricola at Birka, at her store and we chose a bunch more to fill out the swag. She donated some and I bought the rest-

Meanwhile back at the ranch, I was busily designing a medallion to hang off the swag. We knew we wanted a rose inside laurel leaves, but the style and ratios were up to me. I grabbed my handy dandy rose template from the Pennsic Traceable Art project. (which ack, the hosting is going away, someone save this site!) and then went on to the dreaded pinterest.com and searched for laurel wreaths. After being wholly overwhelmed by the variety I picked a simple one since I was going to be carving this into wax.
I then went looking for my kit of wax carving tools and wax. Into the basement! Oh god the basement. Oh look, all these reminders of art projects I’d love to work on if I only had more time to spend on them, but everything is so disorganized and stressful and aaaaaaaaaaa. I couldn’t find the wax. So I ordered more wax. Wax showed up. I found my knives and started working on trying to carve the wax. My knives weren’t really working well on it, and then I found my wax carving tools and things started to go better. But I was running out of time and lost wax casting has one big problem with it – if it doesn’t go well, you have to start over. I figured out a good work around for this, making a silicone mold of the wax mold so you can make another wax to work with to make the mold, but I really didn’t have the time or energy to do this this time around.
So I went back to what I know, soapstone molds. Except that the soapstone we had in the house was full of inclusions and grit and was awful to work with. After an hour and a half of just trying to carve out the round shape for the medallion, I said no. I am not doing this. I packed up my stuff and headed to Master Rozi’s in the morning.
When I got to Rozi’s she asked how things were going and where I was with the project and I explained and said I was totally open for any suggestions she might have as I was rapidly running out of cope. We could engrave, we could etch, we could carve a wooden mold, we could do any number of techniques. I had all my tools and materials with me so there were lots of options.
She told me about the medallions she made for Mistress Tola knitýr. [Here’s Rozi’s Blog post on that] and showed me this simple way to make a copper pendant for a viking swag. It was great and we had copper! So I cut out the shape that we needed and we buffed it up to make it less sharp. (Note to self, I really want a bench belt sander, so fast, so awesome!)

We then took this tag and put it in a vise and folded the tongue around a nail. Rozi laughed at how much easier this was with two people and I said, yeah, you have these apprentices that you could put to work helping with things like this :). I transferred the design to the copper using a sharpie and free handing the design. The center line is there to keep things lined up.

And here’s where the work gets fun and I forget to take pictures.. Someday I’ll be better about this, but probably not until I set up a rig to auto-take the progress pictures.
I started to enscribe the lines with the tools I had with me, and improvised tools that we made from things around the shop until I remembered that David has a ton of metal stamping tools for leather working. He had had other plans for the weekend but came over with his tools in quick order to help. He also brought his chasing and repousse tools that he bought from the Livonia Smithery at Pennsic. I had been contemplating learning this skill set but hadn’t gotten around to it and so I excitedly picked up the tools and went to work, figuring it out as I went along. It just clicked and I went forth and made this awesome thing.
 This picture is awful (mostly lighting, but also it’s just a crop from the larger picture. I may send Dave over to Thyra’s house to get a better picture some day) but it shows the final item. The lines were all tapped into place and then I used various punches and random objects to dish out the shapes. I then put in some texturing using the leather punches.
I would definitely do this again, I had a great time with this art form and reading up on it and watching youtube videos fills me with glee and ideas. It looks like there were also a lot of things I could have done to make it easier to work (primarily having something that holds it in place and allows the metal to move properly.) But I have the basic technique down, so it’s all tuning from this point out. I definitely want to make more copper pendents like this for various awards since it’s so pretty and also great for early period personas. Plus it was pretty easy and fun to make the pendent.
But I was not done yet.. there was still the putting the whole thing together part of the project. So Thursday before the event I went over to Leanne’s to help her with the vigil food and to string the beads. She added a sheep to the horde and there were a few other copper items that I had gotten from Ygraine at birka to add to the swag. I couldn’t find heavy weight thread and was concerned about it getting tangled while being presented in court if they were going to put it on her, so I initially strung it on wire, which was sometimes done in period. I thought that stringing would be a quick and easy thing to do.. Ha. yeah I was wrong. I think I put it together about 15 different ways before I found one that made me happy, and had everything dangling how I wanted it. Then I made handpies and hedgehogs for the vigil.
Friday before the event I realized I needed something to connect the swags and attach it to the brooches during court. I started with some pretty aluminum wire that was coated to look like copper but it was way too soft and bent out of shape very easily. I needed real copper wire. I contemplated driving over to Home Depot but Dave stopped me and reminded me that we had extra romex in the basement. He went down and rescued it for me and I twisted it up into the swirlies that I wanted to make. They aren’t great looking, but they were a last minute solution to a problem that I hadn’t even thought of when I started the project. I hope to make some more in the future, this time planned ahead.
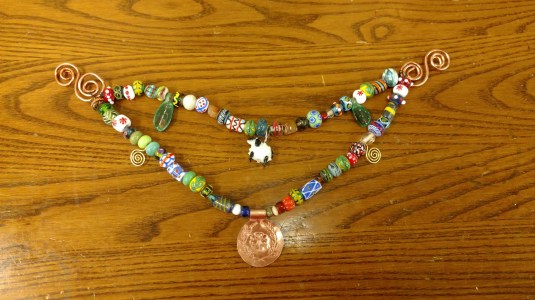
Here’s the finished swag. It came out very well all things considered, and it very much captures Thyra’s serious and silly nature. I hope to make more things in this vein. I’ve been wanting to explore these metal work techniques for years and this was a good push to make me get my tools out.

Recent comments