Today’s woodworking, brought to you by the letter S for snow

So while I was over at Alex’s on Wednesday I borrowed his jigsaw to cut out the first loom iteration from some half inch plywood I had purchased a while back.

Lessons learned:

* Don’t use sharpies for lines, it’s a pain to “erase” since it seeps into the wood (I knew this, I just keep screwing up and need to remember this)

*Curved lines are easier, plan with this in mind

*Plywood will de-laminate. Need to figure out how to avoid this when cutting or drilling into it.

So with that part done, I put everything else I’d need for the loom into my car to wait for my next available time to borrow Rozi’s shop and drill holes for the pegs. Also I needed to cut pegs. And sand them.

When the snow today ended up not being that bad during the daylight hours, I emailed Rozi to see if I could come over and use the shop for a little while. She said yes and so I was off and running.

I had two dowel sizes to work with 3/4″ and 1/2″. Alex and I discussed my options and we thought it might be a good idea to use the larger ones on the outside corners since they seem to get more stress than the inside pegs on the loom, but when I got to the shop I failed to find a way of drilling 3/4″ holes, so I went with all 1/2″ inch holes.

I also had two choices, a regular drill bit and a spade bit. I tried both, both left splinters on the backside of the plywood. I’m still not sure what difference the two options made, but they both worked for my purposes.

2015-02-08 18.39.21Once I had all my holes drilled I cut my pegs and sanded off their sharp splintery bits on the ends. And then I remembered I had 4 shuttles to cut and drill also, so I went back and did that and then sanded them to be not spiky. Though at some point I need to put an edge on each of them as they currently aren’t terribly effective beaters since they are blunt. But I’m curious if my design for how the string goes on will work better for me since I have a hard time keeping the string from falling off. Also man Maple is pretty.

Then I headed to the hardware store to get a bolt for the tension peg, which is great and all, but I need to now make a tension peg and drill a hole in it for the bolt.. Perhaps Wednesday.. Or I might just use the one from my big loom for now. And then home to glue it all together.

2015-02-08 18.27.30

I expanded the tension peg hole a little with hand tools and softened the sharp edges of the peg holes with my hand tools. I then put gaffer tape (it was what I could find, I wanted masking) on the back and put some wood glue in each hole and then put the pegs in, twisting them up and down to best distribute the glue. It’s sitting on a shelf now drying. We’ll see in 24 hours if it’s good enough. I really should have cut holes slightly smaller than my pegs and then forced them into the holes, as it was they slide in easily and I’m not sure if the glue will be enough to hold them properly.

While I had my hand tools out I worked a bit more on my ceder spoon. It’s coming along beautifully. It’s so light and petite. The bottom picture shows it with some butcher block oil on it, and a bit of burnishing work on the bowl to make it smooth and remove all the tool marks. It’s amazing how much adding the oil and burnishing makes it feel more substantial and sturdy. It weighs about as much as a soda bottle cap, but no longer feels like it would break with use. The bend in the handle is based off of one of the UpplandĀ finds, and it really makes for a rather comfortable eating spoon.

2015-02-08 16.22.07 2015-02-08 16.22.13 2015-02-08 18.33.45

Inkle weaving

Remember back forever ago when I made myself a loom?

Built Feb 2014

Built Feb 2014

Well, nearly a year later I finally got around to weaving on it for real. I warped it up and started a trial run, but then I got roped into making trim for Edward’s Birka coat. I had Anna help me start it while I was in Quebec for a baronial investiture or maybe it was some kingdom championship, it all blurs together.. But I started working on the trim there, mostly in the hallway with all the retainers trying to help me do it perfectly, and attracting a bunch of excited locals who were thoroughly impressed, which was hilarious as I had just started, and it really wasn’t going well. But on the ride home from Quebec City, I got pretty good at it and had finished 6Ā feet or so in the car, some in the dark. I took it with me to work on during, er, yule? in springfield. The loom and I started getting into fights, but I finished it up pretty quickly and saw the potential of the inkle loom.

2014-12-22 18.50.33

The blue and green with the red2015-02-03 10.51.52 stripe in theĀ middle was the trim I made in Quebec, this bit was the start of the warping, so it’s pretty amazingly terrible, but after this 8 inches or so it 10934137_10206310022137798_3309149000039387723_olooks pretty good and ended up being the main trim on Edward’s coat. (I also helped make the coat, Thyra’s dress and both of their under tunics.)

I then tried to make a wool bit of trim using self striping yarn, which is coming along interestingly, but I really don’t get along well with my loom. It’s a bit big. It’s hard to use on a table, it’s nearly impossible to use in a chair. I mostly can only use it sitting on the floor. And it’s not scaled properly for me, my arms are quite short and it assumes I am much bigger.

So I had been thinking of making a new loom, based on the plans for the first oneĀ but smaller. My initial plans were to make a loom that was just a little smaller and perhaps a little taller so it would make about the same amount of trim as my larger loom. But I hadn’t had a chance to try out one of the mini looms and they looked so tiny so I was a little hesitant to go that small. But at Bardic, Whitney’s friend Carly lent us one for a little bit, so Sunday I warped it up using a pattern from the ever helpful Inkle Pattern DictionaryĀ using some White Wolf thread picked up at both Pennsic and Birka, and a new smaller shuttle I got at Birka from them as well. I warped it up around 6pm on Sunday, and finished the trim (64 inches) last night around 10pm. Talk about instant gratification!

That's my new shuttle up in the left hand corner of the picture

That’s my new shuttle up in the left hand corner of the picture

So the tiny loom is pretty awesome. I can easily use it on my lap, on the table, in a chair, on a couch, travel around with it! 2015-02-02 22.15.47And I sort of like the tension flap that everyone hates in this loom design. But it’s not perfect. It still has the foot that is shorter than the loom, which makes it not stand well on a table and really seems like not a great design system. Also the pegs are quite loosely attached, which is mostly due to how it was manufactured. The holes don’t go all the way through! But I love the single piece of wood frame and theĀ warping design.Ā 

I got some dowels and a piece of really nice plywood a few weeks ago to make a new loom based on my old one, but now after using this one, I think I’m going to mash both up together! The original big loom has a 30 inch total length, the mini is 15 inches. The big loom is 13 inches tall, the mini is 7 inches. But the difference in the length they can make is not much:102 inches vs 64 inches, or 3 feet. Which seems weak for a doubling the loom in size.

2015-02-03 15.25.53

So I’m thinking, how about 18″ long, with the tension peg where the big one is, and a warping pattern similar to the little one. Maybe also a tension flap like the little on for minor adjustments? And only at most 9 inches tall. Made from 1 piece of plywood with a handle built in, and having a foot that extends the whole length of the loom. I have dowels in an intermediate size, so I’ll probably use those and see how it works. I’m probably going to end up with a variety of sized looms… let me know if you want one. The iterative process will result in a number of looms that aren’t perfect but will work quite well.

A palm leaf scroll for Countess Marguerite

I jumped at the chance to do a troubadour scroll with Anna for Countess Marguerite, who has so inspired me in the SCA. Really if it weren’t for her, I probably would not be playing.

And while we had the option of doing a normal scroll forĀ Marguerite, I knew we had to do one for her alternative persona Megha. So I contactedĀ Baronessa Imiglia Venture for help in researching as she used to playĀ an Indian persona. She pointed me towards a wonderful resource called JAINpediaĀ where I was able to look at extant pieces from all over Asia. It also has the information on where one can find the pieces, which also lead me to the Victoria and Albert museum’s website as they also have an extensive collection.

V then emailed me back and said, you know what would be awesome? A palm leaf scroll like I got for my Kings Order of Excellency. And she linked me to the woman who had made hers for her,Ā Lady Kananbala who documented her process beautifully. And we were off and running. Donovan was in town that night for fencing so he picked up V’s scroll so I would have it to study and I started looking for images for the design.

I wasn’t having a lot of luck searching for a good image that wasn’t of a god or other mythical person, so started googling around a little and hit upon this website of a man who sells Indian miniature paintings. Ā Perfect. So many pictures of people telling stories, singing songs and dancing!

2015-02-01 11.45.42

After trying lots of images on for size, I kept coming back to this one, but it was the wrong style and time period. No matter. I can take the postures and general image and transform it into a more historically accurate picture!

I decided to base the text pages on the design of this manuscript, which could be easily adapted into the palm leaf manuscript format.

Then I found these adorable dancing women and decided I had to use them for the signature page. I sadly am not able to figure out quite where I found them, and google image search isn’t helping.. But I love them so very much. They were also of a slightly too early period, so I had to transform the style a little to help it match the rest of the document’s 1500’s mughal look.

dancing girls

At Birka I went looking for brass bells like V’s scroll had, but couldn’t find any… but I did find some little glass mushroom beads, a golden rose trinket and three cat trinkets to match her whiskey kitties.

When I got home from Birka I started working on the layout and the individual pages I’d need for the scroll. Then I saw the weather forecast with a major blizzard for the 26-28th of January.

2015-01-26 15.55.14I spent all Sunday making a sheet of blanks for Anna to fill in with the words for the scroll and then had intended to get it to her by Monday night, but the snow started early and my rental car is not capable of handling even a dusting of snow. DonovanĀ was planning on visiting MargueriteĀ to do some fencing drills Monday night since their practice had been cancelled, so I enlisted him to drive the blank over to Anna on the way to Marguerite, but then he decided the snow was coming down too hard to make the trip and so the blanks waited at my house until the roads were cleared on Wednesday and Anna could come pick them up.

I took some of my winter confinement to work on the scroll casing, using my new cabinet scrapers to bring the maple boards I was using for the case to a glass like finish. I was very impressed with the sheen I was able to raise on them, and then I accidentally marred them a bit later in the week so I had to use some fine sandpaper to bring them back to perfect, but I had run out of time to make them shine perfectly again.

I sketched out the designs on tracing paper, taking the elements that I wanted to use and getting them into the format I needed. I worked on the layout and tried to figure how best to work the different designs I liked into one document, some did not make the cut, mostly based on time allotted and trying to get things to fit into a logical layout.

2015-02-01 11.47.19

I finally was able to leave my house on Thursday (1/29) to travel to Rozi’s house to borrow some power tools to drill the holes in the wood and work on my East Kingdom Exchange present, that was also due on 1/31… While out, I stopped by Anna’s house to pick up the scroll blank that now had the completed text on it.

Friday (1/30) after work I finished up the EKE present and did my performance review for work then started working on putting the scroll together (7pm). Well, first dinner. Then scroll. I started work on the scroll really around 8pm. I sketched the designs in on the blanks I had made, I found an adorable elephant to hold up the cup.Ā 4x5 original

I started painting around 10 pm. I started with the dancing girls because they were my favorite, I then moved on to the elephant with the cup.

2015-01-31 01.44.00

I’m not really sure why I put them all in leopard print, but it looked pretty neat so I continued. The platforms they are holding are where the king and queen were to sign (and I need a picture of that because it looks so great with their signatures in place) Picture from Kathy’s post on the scroll!Ā 

Then I started working on theĀ frontispiece miniature, which I’m not totally happy with how it came out, the faces ended up a little wonky, but by this point it was around 11:30. I finished up the figures and then askedĀ Anastasia for suggestions on what do about the audience. I mean they have to be performing for someone! We discussed various options, kings, queens, populous, trees, animals – wait, what about cats? I went toĀ JAINpediaĀ and typed in cats, nothing. Lions, er, indian heraldic lions are really weird looking.. Oh wait! what about tigers! It’s eastern! it’s heraldic! I can make them match her kitties! I typed in Tiger and got this goofy looking tiger, but hey, it’s midnight and I can totally freehand draw that! So I added in three tigers watching the performance, and then to balance that, a blue, crowned mushroom, with a tiny maker’s mark mouse peeking around it. (seriously, check out the extant tigers, my goofy ones are totally period) (Also I totally apologize for the faces on my miniatures, but it’s not a style I am familiar with and it was very late at night. The dress on the other hand is based loosely on Megha’s bardic outfit from 2013)

2015-01-31 01.43.05

At this point it is around 1 am. I found a pretty floral design to put in the blank spot of the text (which I accidentally started to erase the pencil lines before the paint was fully dry and then had to fix, patience is important, even at 1 am):

2015-01-31 01.43.46

I erased the rest of the pencil lines from the scroll and then started to cut the pieces out, with an exacto blade and a ruler, in the middle of the night. It is a miracle I did not cut myself. Then I decided to press my luck further andĀ carve a mushroom on the front of the wood scroll holder (I had intended to paint, but I couldn’t bear to cover the beautiful wood grain). Once again I performed a minor miracle in not injuring myself. I applied butcher block oil to the wood and the design came alive on the wood.

2015-01-31 01.42.45

Kathy had donated a bunch of trim to the common house a few weeks ago and when I saw the red and gold ribbon I immediately grabbed it for this scroll. I cut the holes in the panels using my tiniest gouge (still no blood!) and then laced the scroll up, including 3 blank pages for Megha to add her own poetry should she feel moved. Then I sewed the little mushrooms, kitties and rose to the bottom.

2015-01-31 01.44.34

I quietly walked downstairs and placed the scroll in Anastasia’s basket and went back up stairs, where I realized, oh no, the cut sheet! And ran back downstairs to put that with the scroll so Donovan wouldn’t kill me. Then I decided I’d better pack for the event since my ride was coming in about 6 hours, and then fell into bed.

Many thanks to everyone who helped me make this wonderful scroll. It was an honor and a privilege to get to make it for Kathy.

Viking spoon project

For my East Kingdom exchange project I decided to make a viking wooden spoon based on extant pieces found through archeology.

To start I had to decide what kind of wood I’d like to use.

Readily available to me:

Pine, White Pine, Cedar, Maple, Fir, Cherry, Oak, Poplar, Basswood, Apple and Rosewood.

Pine – Pine has a big grain which makes it difficult to carve. Also it has a piney smell, which isn’t ideal for utensils. Also it’s a pretty soft wood, which makes it easy to carve but not very durable. The large grain also makes it pretty prone to breaking.

White Pine – smaller grain, but all the same problems of pine for the sake of utensils. Would be good for non eating projects though.

Cedar – A dream to carve. It’s soft but resilient. The grain is big, but big enough that it sort of doesn’t matter as much. But it’s still a soft wood, which for the sake of this project is problematic mostly in its aroma. It smells lovely. However that’s not what you want out of a spoon you can eat with. It would make a pretty good decorative spoon.

Maple – One of the more expensive but easily found hardwoods. It is of medium hardness for carving. The grain is wide (and wavy!) which isn’t so great for spoons, but makes it really pretty for things like cutting boards, plates and boxes. If you found just the right piece of maple, it would probably make a pretty good spoon, but I didn’t find one.

Fir – Another “soft wood”, though in my experience it was very hard to carve. The grain is very evident and hard to work with. Also it smells piney.

Cherry – One of the other easily available, somewhat expensive hardwood. It varies from medium hardness to extra hard. I apparently have extra hard cherry. It’s a real pain to carve. But I’m tempted to try some other cherry as a lot of people keep recommending it to me. The grain works pretty well for carving, provided its been dried properly. It also has some toxicity, but provided you aren’t chewing on it all day, it’s a pretty minor issue. You wouldn’t want to make a water barrel out of cherry.

Oak – The hardest and most durable hardwood that is readily available for me to try, I’m not a huge fan of how it looks though, and it has a pretty distinct grain pattern that doesn’t play nicely with spoons. It’s better for plates, boxes and other solid objects.

Poplar – One of the cheapest hardwoods readily available. It is relatively easy to carve. The grain isn’t terribly obvious and doesn’t get in the way of carving it. It does tend to turn green if it hasn’t been aged properly or happens to have some of the heart wood in it. This is one reason a lot of people don’t use poplar.

Basswood – Technically this is a hard wood, but it’s really soft. It’s the easiest wood to carve. The grain is very straight, it doesn’t care if you cut it in the wrong direction. It does what ever you want it to do. Bad side – it’s not very durable. My first spoon was basswood and it snapped early on. It’s also not a terribly pretty wood. It’s very light colored and has very little “depth” of color.

Apple – I’ve heard great things about apple. I haven’t had a chance to try it because mine hasn’t has the time dry properly. I’ll probably try it next time.

Rosewood – Very pretty. Also Toxic. Not for spoons. Everyone keeps giving it to me though. I need to get a mask to work with it.

Woods I want to try, that are locally available, but would need to be aged – Ash, Birch, Aspen, WillowĀ and Beech (or I need to find a real lumber yard.)

On the other hand I’m a little scared to try hickory, elm and walnut. For further reading about different wood types:Ā http://www.wood-database.com/

Looking at the woods that have survived the trials of history, mostly we have evidence of hard hardwoods like Oak,Ā Hickory, Elm, Ash and Walnut. But there’s no reason to think that the medium hardwoods would not have been used since they are easier to carve, they just don’t hold up through hundreds of years. Vikings also used a lot of horn for spoons, which I considered but given the safety requirements of carving horn, I decided to start with wood.

For my proof of concept piece I started with cedar. This was actually an accident, as it had been labeled as some other wood but once I cut into it I realized it was cedar. MMm the smell of cedar. So I decided I might as well use it to see how the general shaping would go since I had started it. And wow, cedar is quite nice to work with, though it’s a bit soft and I had some trouble with pieces falling off that I hadn’t intended to remove.
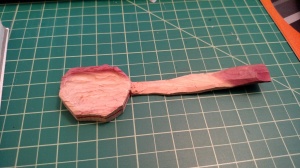
proof of concept

proof of concept

As you can see it has a lovely color and interesting grain patterns. The scent is not noticeable now that it’s been sitting around for a week or two, and it probably could be used for food if it were sealed.

The top curve of the bowl snapped off as I was working the bowl, it’s not a total loss, as it still has a curved side, but it isn’t nicely round shaped. I did not get around to shaping the outside of the spoon bowl.

Extant examples

Using the websiteĀ http://mis.historiska.se/ to find examples of viking spoons (And learning a bit of Swedish in the process, Sked = spoon!) I found a variety of examples of spoons, mostly made out of horn. I limited myself to spoons that were approximately the shape for eating rather than cooking. Most of the surviving spoons are damaged in one way or another, so to get a full sense of the spoon shape, you need to look at a variety of spoons. I also focused on spoons from the Uppland collection, for the sake of sanity.

Horn spoon handle

Horn spoon, seemingly for decorative use

Wooden spoon, probably for stirringĀ / Strangely curved wooden spoon from the same find

Frustratingly great diagram of various viking spoons without attributionĀ (google image search just keeps bringing me back to pinterest)

Curly birch spoon fromĀ Uppland

Flat ended bone spoon with decoration

I decided to go with the general shape/size of the bone/horn spoons and the wood spoon’s overall shape, including trying to figure out the bend in the handle.

side view of spoons

The top one is my second attempt, the bottom is the first, Both have the bowl of the spoon towards the top of the screen. I think the first attempt is more historically accurate, but seems like it would break easily. So since I want the spoon to last a few meals, I went with the more modern concave curve, vs the convex historical spoon.

However, the horn made spoons more closely resemble the second attempt, so there is a decent chance that there were wooden spoons made in this shape.

To make the spoon I went to home depot and bought a half inch board of poplar, after a lot of agonizing over the wood choice. (I actually bought Oak, Maple and Poplar, but decided to use the poplar)

I then took a survey of the extant spoons I had found and figured out the average size of an eating spoon, the average length worked out to around 16 cm, with a wide bowl, narrow handle, ending with a perpendicular squared off end.

spoon research

So I took my board and traced out the design and then totally went off the historical road map and borrowed my friend’s band saw, ta da, instant spoon blank. I then drew the elevation on the side of the spoon and started carving away with my Flexcut knives and Lee Valley chisels and gouges. Soon I had something resembling the cedar version. (sorry, forgot to take a picture)

2015-01-30 17.23.46

I then sanded it up a bit :

2015-01-30 17.23.57

Much lighter and spoon like! Now to decorate the handle with incised interlacing like the bone handles.

2015-01-30 18.41.40

I then used Butcher block oil to make it durable and food safe.

(Here’s the spoon with the first coat)

2015-01-30 18.56.21

Light desk

For a very long time, probably since I first saw one around age 12, I’ve wanted a light box for tracing. Since I was already making a drawer to replace one that had rotted out in our kitchen, I figured it would be a good time to try my luck at making a light box since it’s pretty much the same general skills.

I bought poplar “craft wood” from Lowes, which is nice to work with and some luan plywood, which I haven’t worked with since my theater tech days when it was what we made in to practically everything. I designed it to have a desk top that is approximately 14×14″, which should allow for most sizes I’d want to work with, and should be big enough for water colors.

The angle of the writing surface is around 20 degrees, which is a bit shallow for calligraphy but is pretty comfortable to work on in general, I figure I can raise it up a bit using something to prop it up if I find need. The plexiglass top comes off entirely, which will make it easy to set things up using painter’s tape to adhere securely. (The painter’s tape is also along the edges of the plexiglass to make it safe)

2013-11-17 16.41.07

The bottom is channeled in like a drawer. The 1/4 inch luan turned out to be about two blades width of the table saw, which was convenient.

2013-11-17 16.41.30

I plan to eventually carve some grooves into the top flat bit for resting brushes and pens. Also perhaps an opening for water or ink containers. I also need to drill a hole in the back to put in the the light. And finish it with wax to preserve the wood.

2013-11-17 16.41.17